
The Right Way to Self-Host: Set It Up Once and Leave It Alone
Debian, SSH hardening, Docker, and a firewall strategy that actually works — the setup you configure once and forget about.
Self-hosting has a reputation for being a hobby for people who enjoy maintaining things. The assumption is that you will be patching servers on weekends, wrestling with firewall rules at midnight, and rebuilding things from memory when something breaks. That reputation exists because most guides get you to running and stop there. They do not get you to stable.
I have been running self-hosted infrastructure for a long time. I have made most of the obvious mistakes. What follows is the setup that actually works: a server you configure once, automate properly, and then leave alone. The goal is a machine where the only legitimate reason to SSH in is genuine hardware failure. Everything else should happen without you.
The Mistakes That Taught Me This
Before we get into the right way to do things, let me tell you about some of the ways I got there.
The RocketChat incident. I was running RocketChat as a self-hosted chat server. Trusted project, widely used, seemed perfectly reasonable. What I had not done was think carefully about what happens when a container runs as root and has a vulnerability. Someone found one. The RCE gave them root inside the container, and from there they were on the host. The first sign something was wrong was my server appearing in network scans as an SSH attack source. I found it running XorDDoS and a variant of the BillGates botnet, complete with injected SSH keys so they could come back whenever they liked. The machine was being used to brute-force other people’s servers while I was obliviously going about my day.
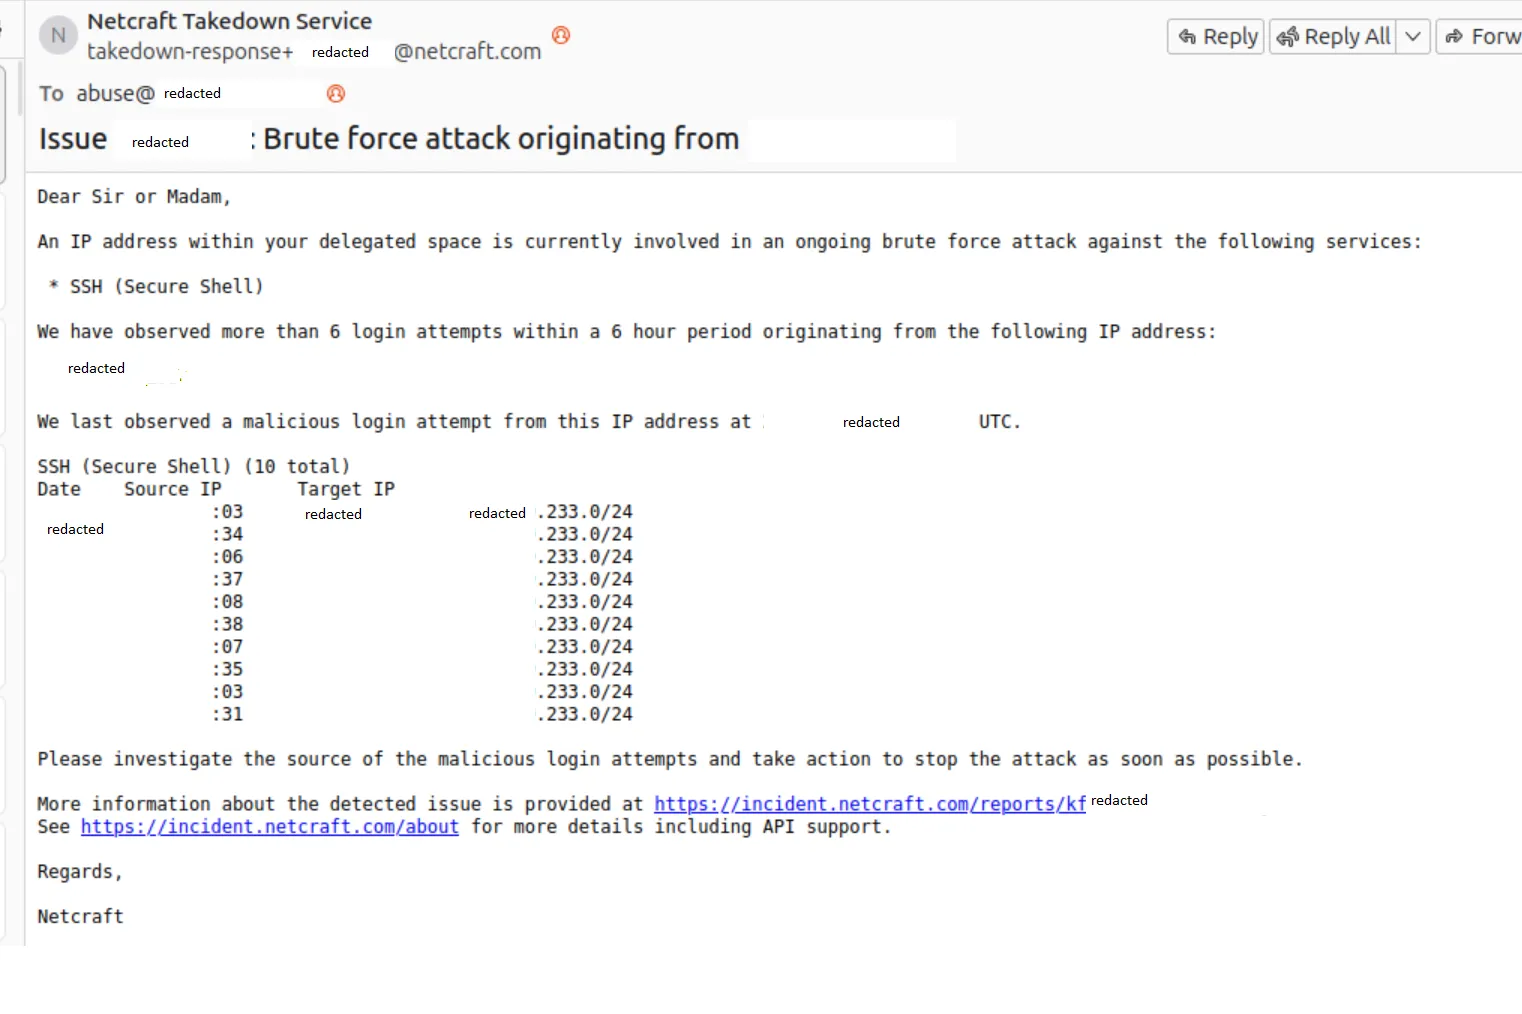
I did not even know any of this was happening until that email arrived, a day or so after the fact. I still do not know how they tracked it back to me. If they had not emailed, who knows how long it would have gone on. Days? Weeks? And that is just the part I can account for. The server was on my home network at the time. What else they poked at while they had a foothold, I genuinely do not know. That thought still bothers me.
The lesson: a “trusted” container running as root is not trusted. The trust stops at the image. If the application inside it has a vulnerability, root in the container is a stepping stone to root on the host. More on this in the container section.
The exposed Postgres port. At some point I had a Postgres instance with port 5432 bound to 0.0.0.0 instead of 127.0.0.1. Not intentionally. It crept in through a Docker networking change I had not fully thought through. Automated bots scan for exactly this. Within hours, they connected and dropped every database on the instance. No ransom note, no demands. Just gone. They almost certainly exfiltrated everything first, which is somehow worse than the ransom variant of this attack where at least you know what happened. In my case the data was just out there, in the hands of whoever was running that scan, and I had no idea what they planned to do with it.
The lesson: anything that should not be public-facing must be explicitly bound to localhost or an internal network. Assuming it is not reachable because you did not intend it to be is not a security posture.
These are not the only mistakes I made. They are just the ones that hurt enough to stick. The rest of this post is essentially the result of accumulating enough of them to know what actually matters.
Start with Debian
The first decision is the distribution. For a server you want to forget about, the answer is Debian.
Debian is conservative by design. Packages in stable are old by the standards of a development machine, but old here means tested, well-understood, and unlikely to surprise you at an inconvenient moment. The release cycle is deliberately long and the contract is explicit: stability comes first, and breaking changes do not ship without serious justification. It is boring in exactly the way you want a server to be boring.
Ubuntu is the more common recommendation and for desktops that is fair enough. For a server you intend to leave running for years, the differences start to matter. Ubuntu’s faster release cadence means more moving parts. The snap ecosystem behaves differently from the rest of the package manager and creates real friction on headless systems. I have also had Ubuntu installs simply fail to complete on hardware that Debian handled without complaint. When you are staring at a remote console trying to get something back online, you do not want to be debugging an installer.
Debian stable installs, runs, and does what you configured it to do. That is the pitch and it is enough.
Harden It Before You Do Anything Else
The moment a server has a public IP address, it is being scanned. Automated tools probe common ports, test default credentials, and catalogue anything that responds. This is not paranoia, it is just what happens. Hardening is not optional and it is not something to come back to later. Do it before the machine touches the internet.
Start with the package baseline:
apt update && apt upgrade -y
apt install unattended-upgrades fail2ban -y
dpkg-reconfigure -plow unattended-upgrades
Unattended upgrades handles security patches automatically. The machine keeps itself current without requiring you to log in each time Debian pushes a fix. Some people are uncomfortable with automatic updates. My view is that leaving a known vulnerability unpatched while you find time to review the changelog is worse than trusting the process. Security patches exist because something was found. Install them.
Fail2ban watches log files for repeated failed authentication attempts and temporarily blocks the offending IP. The default configuration covers SSH out of the box. Set a sensible ban time and threshold and leave it running. It is not your primary defence but it cuts the noise significantly.
SSH configuration is where the meaningful hardening happens. Edit /etc/ssh/sshd_config:
PermitRootLogin no
PasswordAuthentication no
PubkeyAuthentication yes
X11Forwarding no
MaxAuthTries 3
AllowUsers youruser
Disable root login. Disable password authentication entirely and use keys only. Restrict which users can connect. Generate a key pair on your local machine, add the public key to ~/.ssh/authorized_keys on the server, verify you can connect with it, and only then restart sshd. Do not close your existing session until you have confirmed the new configuration works. I have locked myself out of servers doing this wrong. Learn from that.
Once this is in place a brute force attempt has nowhere to go. No root to target, no passwords to guess, and fail2ban handling anything that persists anyway.
Codify Everything with Ansible
The hardening steps above should not be performed by hand and then hoped to be remembered. I learned this lesson after rebuilding a server and spending an afternoon trying to reconstruct what I had originally configured. Do not do that. Write it as code, store it in a repository, and apply it with a tool.
Ansible is the right tool here. It is agentless, connecting over SSH and running tasks using Python on the remote machine. Nothing needs to be installed on the server first. You write playbooks describing the desired state of a machine and Ansible ensures the machine matches that description. The same playbook that built the server rebuilds it from scratch on new hardware.
A reasonable question at this point: if Ansible connects over SSH, and we just said not to SSH in manually, does that not contradict itself? Not quite. Ansible uses SSH as a transport, but you are running commands from your local machine through automation, not sitting at a terminal making undocumented changes. The discipline is about avoiding ad-hoc manual intervention, not about SSH as a protocol.
That said, there is one legitimate manual step at the very beginning. Before Ansible can connect, it needs a way in. The bootstrap process is this: fresh server arrives, you SSH in once with a password or the hosting provider’s console, add your public key to ~/.ssh/authorized_keys, and then you are done. From that point forward, Ansible drives everything and you close the terminal.
The critical property of Ansible is idempotency. Running a playbook twice produces the same result as running it once. Ansible checks whether a task is already satisfied before applying it. You can run the playbook against a live machine to apply a single change without worrying it will undo things that are already correct.
The playbook handles the full initial provisioning, including cloning your infrastructure repo and bringing the stack up:
- hosts: servers
  become: true
  tasks:
    - name: Install base packages
      apt:
        name: [unattended-upgrades, fail2ban, ca-certificates, curl, git]
        state: present
        update_cache: true

    - name: Harden SSH
      lineinfile:
        path: /etc/ssh/sshd_config
        regexp: "{{ item.regexp }}"
        line: "{{ item.line }}"
      loop:
        - { regexp: '^#?PermitRootLogin',       line: 'PermitRootLogin no' }
        - { regexp: '^#?PasswordAuthentication', line: 'PasswordAuthentication no' }
        - { regexp: '^#?X11Forwarding',          line: 'X11Forwarding no' }
        - { regexp: '^#?MaxAuthTries',           line: 'MaxAuthTries 3' }
      notify: Restart sshd

    - name: Install Docker
      shell: curl -fsSL https://get.docker.com | sh
      args:
        creates: /usr/bin/docker

    - name: Clone infrastructure repository
      git:
        repo: "git@github.com:youruser/infrastructure.git"
        dest: /opt/infrastructure
        version: main

    - name: Bring up the stack
      community.docker.docker_compose_v2:
        project_src: /opt/infrastructure
        state: present

  handlers:
    - name: Restart sshd
      service: name=ssh state=restarted
Ansible also needs an inventory file mapping names to IP addresses. Provisioning a new machine from scratch is then ansible-playbook -i inventory playbook.yml from your local machine. One command, one SSH session you already closed, and the server is fully configured with your stack running. No tribal knowledge, no runbook that was last updated two years ago. The playbook is the documentation and the implementation simultaneously.
If You Have to SSH In, Something Is Not Finished
This principle shapes everything that follows. A properly configured server does not require manual intervention for routine operation. Updates, certificate renewals, deployments, configuration changes: all of it should happen through automation.
Every manual SSH session is a quiet form of drift. You make a change directly on the machine, it is not captured anywhere, and the gap between what the server is actually doing and what your configuration says it should be doing grows a little wider. Months later something behaves unexpectedly, you cannot reconstruct the reasoning behind an undocumented change, and you spend an afternoon doing archaeology.
The discipline is to push changes through the tooling. If you find yourself reaching for SSH to fix something directly, the correct response is to understand why the automation did not handle it and fix the automation. Not once, not as a temporary measure. Every time.
The Container Stack
Docker is the foundation. Not because containers are inherently superior to running processes directly, but because they establish a clean boundary between the host and the software running on it. Dependencies are contained. Updates are image pulls rather than package manager interactions. Rolling back means running the previous tag. The host stays clean and predictable.
Install Docker from the official repository rather than the docker.io package in Debian’s repos, which tends to lag behind. The one-liner from Docker’s own documentation is fine:
curl -fsSL https://get.docker.com | shOn top of Docker, a small set of tools that earn their place:
Nginx Proxy Manager handles reverse proxying and TLS termination through a web interface. You define a proxy host, point it at a container, and it issues and renews the Let’s Encrypt certificate automatically. No manually editing nginx config, no running certbot, no certificate expiry incidents. A new service gets a domain and HTTPS in a few minutes.
Watchtower watches your running containers and pulls updated images when they become available, restarting each container with the new image. Combined with a CI pipeline that pushes a fresh image on every merge to main, this gives you continuous deployment with no deployment step on the server itself. Code is pushed, the pipeline builds and publishes the image, Watchtower picks it up, the container restarts. You were not involved. Worth noting: the original containrrr/watchtower repository has slowed down significantly and is not actively maintained. There are community forks that are more actively developed — it is worth checking GitHub for the current best-maintained option before picking one.
Woodpecker CI is a lightweight self-hosted pipeline runner. Configuration is a YAML file in the repository. It handles building, testing, and pushing images to a registry. If you are already running containers, adding Woodpecker is one more compose service.
For workloads that warrant it, ArgoCD brings GitOps to the deployment layer. The desired state of your deployments lives in a git repository and ArgoCD continuously reconciles the running state to match it. Drift is corrected automatically. Every change has a pull request and a history. This scales well, though for a single server, Watchtower and a straightforward CI pipeline serve most purposes with considerably less overhead.
The infrastructure stack lives in a single docker-compose.yml in a git repository. Ansible clones this repo and brings the stack up as part of the initial provisioning run, so you never need to manually copy files to the server or run docker compose up by hand. From that point, updating the compose file is a git push — Ansible can re-apply the playbook to pick up changes, or you can have a small script on the server that pulls and restarts on a schedule. A minimal starting point:
services:
  nginx-proxy-manager:
    image: jc21/nginx-proxy-manager:latest
    restart: unless-stopped
    ports:
      - "80:80"
      - "443:443"
      - "81:81"
    volumes:
      - ./data/npm:/data
      - ./data/letsencrypt:/etc/letsencrypt

  watchtower:
    image: containrrr/watchtower:latest
    restart: unless-stopped
    volumes:
      - /var/run/docker.sock:/var/run/docker.sock
    command: --interval 300 --cleanup

  woodpecker-server:
    image: woodpeckerci/woodpecker-server:latest
    restart: unless-stopped
    volumes:
      - woodpecker-data:/var/lib/woodpecker
    environment:
      WOODPECKER_OPEN: "false"
      WOODPECKER_AGENT_SECRET: "${WOODPECKER_SECRET}"

volumes:
  woodpecker-data:
The CI pipeline in each application repository closes the loop. Woodpecker picks it up, builds the image, and pushes it to a registry. Watchtower handles the rest.
# .woodpecker.yml
steps:
  - name: build-and-push
    image: plugins/docker
    settings:
      repo: registry.example.com/myapp
      tags: latest
      username:
        from_secret: registry_user
      password:
        from_secret: registry_password
Push to main. Image is built and published. Watchtower polls the registry, detects a new digest, pulls the image, restarts the container. The deployment happened and you were not involved.
One thing worth being deliberate about: Watchtower and a handful of other tools require access to the Docker socket at /var/run/docker.sock. Socket access is effectively root on the host. Be careful about which containers get it and never give it to your own application containers. Run processes as non-root users inside containers using user: in your compose service or a USER instruction in the Dockerfile. Use named networks in compose to limit which containers can reach which. By default every container on the same compose network can talk to every other one, which is more permissive than most services actually need.
Know When Something Breaks Before Your Users Do
The goal is a server you do not touch, but that does not mean a server you ignore. You want to know when something stops working before someone else tells you.
Uptime Kuma is a self-hosted uptime monitor with a clean interface. It pings your services on a schedule and notifies you when something stops responding, via email, Telegram, Slack, or a webhook. Add it to the compose stack:
  uptime-kuma:
    image: louislam/uptime-kuma:latest
    restart: unless-stopped
    volumes:
      - uptime-kuma-data:/app/data
Add a monitor for each public-facing service and one for the internal admin interfaces. Five minutes of downtime you were notified about is manageable. Five hours you discovered yourself is not.
For system-level metrics, Netdata is lightweight and requires no configuration to get useful dashboards. It runs as a container and stores data locally. If you need persistent metrics, custom dashboards, and proper alerting, Prometheus with Grafana is the right call. It is meaningfully more complex to set up and operate. Worth it when you need it, overkill when you do not.
Docker’s native health check is worth using regardless of which monitoring stack you choose:
  myapp:
    image: registry.example.com/myapp:latest
    restart: unless-stopped
    healthcheck:
      test: ["CMD", "curl", "-f", "http://localhost:3000/health"]
      interval: 30s
      timeout: 10s
      retries: 3
      start_period: 40s
restart: unless-stopped handles transient crashes. The health check handles containers that are running but not working. Between the two, most failure modes recover automatically before anyone notices.
Backups
There are two distinct things to back up and they need different treatment.
Configuration is already handled if you have followed the approach in this post. Ansible playbooks, compose files, and pipeline definitions all live in git. Rebuilding from scratch means cloning the repository and running the playbook. Configuration backup is solved by the same discipline that makes the setup reproducible.
Data is a different matter. Databases, uploaded files, persistent volumes: anything that exists only because of user activity and cannot be regenerated from source code needs explicit, automated, offsite backup.
rclone syncs directories to virtually any storage destination: S3, Backblaze B2, Cloudflare R2, a remote SFTP server. Configure a destination, write a sync command, schedule it with a cron job or a small container that runs on a timer. The configuration is a file in the repository and the credentials are environment variables.
The thing most people skip is testing restores. A backup you have never restored from is a backup you cannot trust. Run a restore test on a separate machine every few months. It feels unnecessary until the day it is not.
Firewalls: Handle It at the Router, Not on the Host
This is where most self-hosting guides get it wrong. I got it wrong too, for longer than I would like to admit.
The standard advice is to configure ufw on the server. Lock down the ports, allow only what is needed, deny everything else. It sounds correct. The problem is that Docker does not respect it.
Docker manages its own iptables rules. When a container exposes a port, Docker inserts rules directly into the PREROUTING and FORWARD chains, which are evaluated before the INPUT chain where ufw operates. A container exposing port 8080 is reachable from the network regardless of what your ufw rules say about port 8080. The firewall you configured is not doing what you think it is doing.
There are workarounds. You can bind container ports to 127.0.0.1 so they only accept local connections. You can set "iptables": false in Docker’s daemon configuration, which breaks container networking in ways that require manual correction. You can write custom iptables rules that account for Docker’s own chains. Each of these is fiddly, creates complexity that compounds over time, and introduces the possibility of a silent misconfiguration that leaves ports open you believed were closed.
The cleaner approach is to stop fighting Docker at the host level and handle ingress at the router.
A router running OPNsense or pfSense gives you a firewall where the rules are visible, understandable, and easy to change. The configuration lives in one place rather than distributed across iptables tables on multiple hosts. When you need to debug why something is not reachable, there is one place to look.
The rule set for a typical self-hosted setup is straightforward. Inbound, allow port 80 and 443 to the server; these go to Nginx Proxy Manager. Block everything else by default. SSH should not be reachable from the open internet at all. Access it through a VPN. Admin interfaces like the Nginx Proxy Manager UI, Uptime Kuma, and Woodpecker should never be publicly exposed, only accessible from within the network or over VPN.
WireGuard is the right tool for private access. It is fast, has a small attack surface, and the configuration is a few lines of INI. Install it on the server, open the WireGuard port (51820 UDP) at the router, and connect from any device that needs to reach internal services. From outside your network you are a VPN client; from inside you have full access to anything not publicly exposed.
The server itself does not need a host-level firewall when nothing on it is listening that should not be. Nginx Proxy Manager is the only public inbound entry point, WireGuard is the private one, and the router controls what reaches the machine at all. The layers reinforce each other rather than conflicting.
Separate the Server Network from the Home Network
This gets less attention than it deserves. Running self-hosted services on the same network as personal devices, family laptops, and smart home hardware is a liability. A compromised device on the home network can probe anything on the same subnet. A misconfigured service has a path to personal machines. When something goes wrong on one side it can affect the other.
The right topology is two distinct networks with an edge device controlling what crosses between them.
The simpler approach if your router supports it is VLANs. Define two VLANs, one for servers and one for the home network, assign ports on a managed switch accordingly, and configure the router to treat inter-VLAN traffic as it would traffic from different physical networks. Firewall rules between the VLANs control what can cross. Most prosumer routers and anything running OPNsense handle this without difficulty.
The more robust approach is two physical routers with a firewall in between. All traffic between the two sides passes through the edge device and is subject to whatever rules you have written. A UniFi Dream Machine covers this in a managed appliance if you prefer not to build your own.
Either way the assignment is:
- Server network: self-hosted services, CI infrastructure, development machines, anything with access to your data
- Home network: personal devices, media players, smart home kit, guests
Traffic that needs to cross goes through the edge and is allowed by explicit rule. Everything else is blocked by default. A device on the home side cannot reach the server network because they are not on the same broadcast domain. It is an actual security boundary rather than a labelling convention, and it costs nothing except the initial configuration.
When Things Go Wrong
Automation fails. Containers crash in ways health checks do not catch. A Watchtower pull brings in a broken image. A disk fills up. A deployment lands something that does not start. None of this is hypothetical. It will happen.
The answer is not more manual intervention, it is better instrumentation. Uptime Kuma tells you the service stopped responding. The health check restarts the container. restart: unless-stopped handles transient crashes. A webhook fires before you would have noticed anything. For the failures that automation cannot recover from, genuine hardware trouble or corrupted data, you SSH in, fix the root cause, and then capture the fix in the tooling so it does not happen the same way again.
The discipline of avoiding manual changes is not about being precious. It is about ensuring that when something breaks, you have an accurate picture of what the server is supposed to be doing. If that picture is correct, debugging is straightforward. If it has drifted through a series of undocumented interventions, debugging is archaeology and you have nobody to blame but past you.
The Outcome
Set up correctly, the server becomes infrastructure rather than an ongoing project. Debian patches itself. Ansible can reproduce the machine in minutes. Containers restart with new images when you push code. Certificates renew without intervention. Uptime Kuma catches outages before users do. Backups run on a schedule. The router handles ingress without Docker undermining it. The server network is isolated from the home network at a level that is actually enforced.
The measure of success is months passing without opening a terminal pointed at that machine. If you find yourself SSHing in regularly, something is incomplete. Find it, automate it away, and close the terminal.
The server should run itself. Your job is to make that possible and then get out of the way.
Discussion